Feathers in Our Nest

a blog about faith, family, food, & more written by a wife and stay at home mom of five

  • Home
  • About
  • Recipes

How To Brew the Perfect Cup of French Press Coffee

November 1, 2013 by Aliesha

Enjoy today’s guest post by Tad! –Aliesha


You know the taste of that first pot of coffee made from a freshly opened can of grounds? It is always so delicious, but over time the flavor tends to get stale and old. In my pursuit of being able to make a cup of coffee that tasted as good as that first pot, I discovered the French press method, which is a method of making freshly ground coffee that tastes even better than that first pot. It can make a strong, smooth cup of coffee without any bitterness.

French press coffee is made using a coarser grind than a standard drip pot. Because of this, it is import to grind your coffee at home. Grinders can be purchased for around $20. We use a hand-cranked burr grinder instead of an electric blade grinder because it achieves a more even grind. Freshly ground coffee tastes significantly better than coffee that is ground and then stored for a length of time.

Here is how to brew the perfect cup of French press coffee.

When making French press coffee (or any method of brewing, for that matter), it is best to grind your coffee immediately before brewing.

Things you need:
whole bean coffee
coffee grinder
measuring spoon
measuring cup
pot or tea kettle
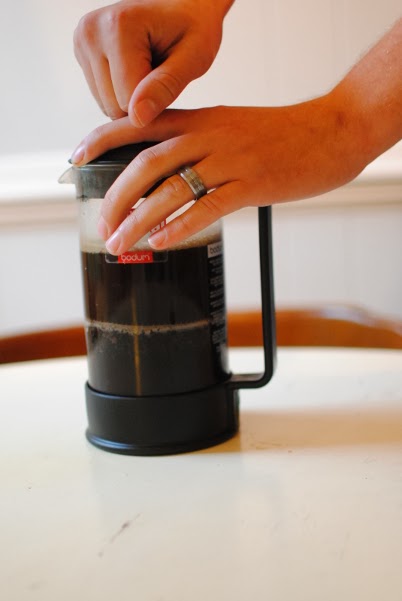
French press (we use the Bodum Brazil)
wooden or plastic spoon

How to:
Grind your coffee. You should use 2 Tbsp. of coarsely ground coffee for each cup of water.  I usually make three cups of water and 6 Tbsp.

Heat water on a stove in either a pot or a kettle. The water should not be boiling, but instead should be between 195 and 205 degrees. Typically it is around the right temperature the first moment a tea kettle makes a peep (before it is “shrieking”). Alternately, you can use an instant read thermometer after water has been brought to a boil. Track the time it takes to drop to 205 degrees after is has been removed from the heat so you don’t have to use the thermometer every time.

Place the ground coffee in the bottom of the French press and the water poured on top. Stir the coffee. Place the lid on the press, leaving the filter above the surface of the coffee.

Brew the coffee for about 5 minutes, and then press the plunger straight down. If you don’t push it straight, you may get grounds in your coffee.

Even after being pressed the coffee may continue to brew, so pour your coffee into a mug to enjoy immediately.

Enjoy!

Aliesha Caldwell is a participant in the Amazon Services LLC Associates Program, an affiliate advertising program designed to provide a means for sites to earn advertising fees by advertising and linking to amazon.com.

Filed Under: beverages, cooking, food, step-by-step, Tad

Whole Grain Pie Crust

March 5, 2013 by Aliesha

This post has also been posted on Baking Whole Grains, a site I write for which compensates me for sharing whole grain recipes.  While I receive compensation, this does not influence my opinions.  All photos and directions are my own. 

Since transitioning our family to real food and whole grains, I have struggled to find a pie crust recipe that was delicious, flaky, and made with 100% whole grains!  A week ago Cordelia turned one and we celebrated with a “cutie pie” themed birthday party.  I experimented on all our guests (family) by making wheat and spelt pie crusts, which, fortunately turned out GREAT!

The key to a beautiful, flaky pie crust is not mixing in your butter fully (you want to see flecks of butter in your dough when you roll it out).


Whole Grain Pie Crust
adapted from here

2 1/2 cups whole wheat or spelt flour, freshly ground (I’ve used wheat and spelt and liked both)
1 Tbsp. organic evaporated cane juice (or sugar)
1 tsp. sea salt (like Real Salt)
2 sticks butter, chilled
up to 1 cup ice water

Grind wheat or spelt in the WonderMill.

In a mixing bowl, combine flour, evaporated cane juice, and sea salt using a whisk.

Cut butter into cubes and add to the dry ingredients.  Using a pastry cutter, cut in the butter until the lumps resemble large peas.

Add 1/2 cup very cold water and mix with a rubber spatula.  Add water, 1 Tbsp. at a time, as needed until crust comes together but is not sticky.

Place dough onto a sheet of plastic wrap, form into a disc, wrap up, and place in the fridge.  Let dough chill for 2 hours.

When dough is chilled, sprinkle flour on your work surface.  Divide dough into two halves.  With a floured rolling pin, roll it out.  Smitten Kitchen has a great tutorial for rolling out a pie crust.


Place crust in pie tin, fill with chicken pot pie filling, and top with the second crust.  (You can also use this recipe for a sweet pie, shown below.)  I like doing a lattice weave or something fun like that.

Bake as recipe directs.

mini blueberry pies


Enjoy!

Like this recipe? Follow me so you never miss a new recipe post!
For more of our family’s favorite recipes, click here.
This post contains an affiliate link to the grain mill I use and love!

Filed Under: baking whole grains, cooking, healthy eating, miscellaneous, recipes

Host a Soup Swap (In Lieu of a Cookie Exchange)

November 15, 2012 by Aliesha

I recently participated in a Soup Swap (it’s like a cookie exchange!) with some friends in Richmond.  Instead of bringing cookies to exchange, everyone brings soup and then goes home with several meals of soup for their family.

It’s a brilliant idea, really.  I mean, who doesn’t want to have a few nights off from cooking around the holiday season?

My freezer is now stocked with bags of soup that I can just pull out as needed on a busy day in December!

Here are some ideas for you if you want to plan a Soup Swap with your friends!


-Determine how many people want to participate (6-8 is good; less if the families are large).  You could also do this with a larger group (like 12) and still have each person only cook for 6 families.

-Let everyone know how much soup to make (i.e., 8 bags of 4 servings each) so that everyone who brings soup will get to take soup home.  Four servings is good for families with 2-4 people.

-You can have people “sign up” for different types of soup ahead of time, but you don’t have to.  We didn’t, and we still had an awesome variety of soups with no repeats!  Here is a great source for soups that freeze well.

-Ask everyone to package their soup in Zip-lock (I recommend the name brand) freezer bags.  (I like to ladle my soup in once it’s cool.)  It’s helpful if everyone labels their bags of soup (even if it’s just with a Sharpie) with the type, the date, the servings, and any heating/serving instructions.

-Designate a time and place where you can exchange your soups.  Have everyone bring a cooler so they can transport their soups home after the exchange.

-I recommend freezing the bags of soup flat (before or after the exchange) so that they store better in the freezer and so they thaw more easily.  I also recommend thawing the bags of soup inside a bowl or on a dish of some kind just in case the bag leaks.

Have you every participated in a soup swap?  Aren’t they great?

Happy swapping!!

Filed Under: cooking, freezer cooking day, friends, gift ideas

  • « Previous Page
  • 1
  • 2
  • 3
  • 4
  • 5
  • …
  • 28
  • Next Page »
About Us

This blog shares our family's story and our journey from newlyweds to a family of seven. We share milestones, we share struggles, we share sweet memories, and we share about our Savior. Keep reading...

FACEBOOK

NEWSLETTER

Subscribe to our super-fun weekly newsletter! Enjoy exclusive content & fun bonuses!

* indicates required

Archives

INSTAGRAM

PINTEREST

Visit Aliesha @ Feathers in Our Nest's profile on Pinterest.

Popular Posts

newborn sleep routine

10 Tips for Establishing a Newborn Sleep Routine

What I Buy at Aldi

What I Buy at Aldi {Real Food}

essential oil blends

Essential Oil Blends – What Works for What?

DIY Citronella Candles {Keep Mosquitoes at Bay!}

Dream Diaper Bag: Review of Lily Jade Shaylee

Baby Basics: Guide to the Products I Love

Perfect Cold Brew Coffee at Home! Easy DIY recipe using a French Press | Feathers in Our Nest

Perfect Cold Brew Iced Coffee

See Other Popular Posts...

About Feathers in Our Nest

At Feathers in Our Nest, you can expect to find delicious recipes, homemaking tips, practical advice for frugal living, resources for those who are in ministry, inspiring links, and cute photos and stories about our children. You can browse older posts by checking out the Tips & Tutorials Page or the Recipes Page. Thanks for visiting! Read More…

Recent Posts

Easter Family Devotions | Feathers in Our Nest
Gospel Centered Books for Older Kids | Feathers in Our Nest
Gospel Centered Family Devotionals | Feathers in Our Nest
Gospel Centered Story Bibles | Feathers in Our Nest
Gospel Centered Picture Books | Feathers in Our Nest

Popular Topics

baby baking whole grains birthdays books bread breakfasts Christmas cooking Cordelia crafts deals decorating desserts essential oils everyday fall family food friends frugal living giveaways health and beauty healthy eating holidays homemaking hospitality house Jude main dishes marriage menu monday milestones ministry parenting photography pregnancy projects recipes reviews she {hearts} it sponsored Tad travels Vera worth repeating

Copyright © 2026 · Foodie Pro Theme by Shay Bocks · Built on the Genesis Framework · Powered by WordPress

Sign up below to join the Feathers in Our Nest email list!
Every Friday, you'll get exclusive content: the latest posts, recipes, photos, & more!
Your information will never be shared or sold to a third party.