Feathers in Our Nest

a blog about faith, family, food, & more written by a wife and stay at home mom of five

  • Home
  • About
  • Recipes

Creating a Pillow from a Placemat {the Easy Way!}

October 28, 2013 by Aliesha

I’m all about SIMPLE crafts/DIY projects these days, mainly because I’m too busy for anything crafty that takes longer than 10 minutes!

I whipped up this pillow in less than 10 minutes, and my sweet mother-in-law insisted I blog about it.  It’s nothing earth-shattering, but I always enjoy reading about frugal, easy home decor projects, so I’m sharing it!

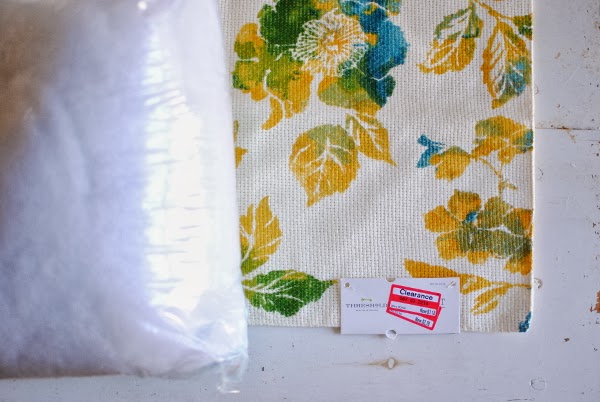
I found a placemat on clearance at Target (Threshold brand) for $1.18, and I was immediately drawn to it.  The fabric is printed, but the texture makes it look embroidered.

I checked the back, and I realized that because of the layers (the back was a light-weight fabric), I could easily turn it into a pillow just by cutting open part of a seam and stuffing it.

If you want to make a pillow like this, you’ll need to find a placemat with a fabric back that is not fused to the front of the placemat.  You’ll also need some stuffing!  (I actually unstuffed a cheap IKEA pillow and used that for filler.)

Note: A slightly more difficult way of converting a placemat into a pillow is adding a piece of fabric as the backing, sewing it right sides together leaving an opening, turning it right side out, and stuffing. 

Using a needle and scissors (or a seam ripper), carefully remove the threads on one seam to create an opening wide enough to allow you to stuff the pillow.

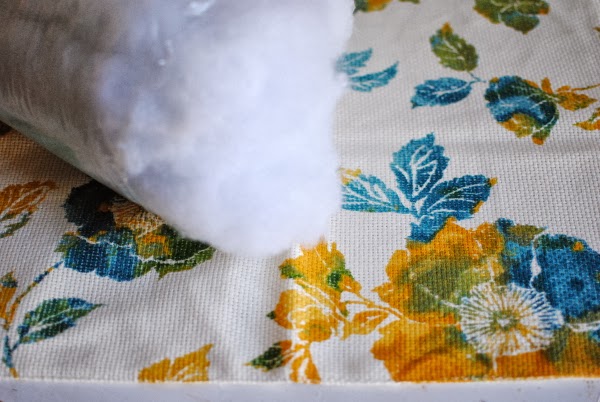
Fill the pillow with stuffing, then hand-stitch the seam closed.  Fluff the pillow, and you’re done!

This project cost me $3.18 total, but your cost may vary.

If you enjoyed this tutorial, feel free to pin it!


Filed Under: crafts, decorating, frugal living, living room, projects, sewing, step-by-step

Give Thanks Fall Leaf Wreath Tutorial

November 5, 2012 by Aliesha

Over the weekend I whipped up this free little project using materials I had on hand.  I love crafts like this: EASY, FAST, and FREE!  Even if you have to buy the material for this, it’s still under $3 to make.  It’s the perfect little touch for your home as we move into the “Season of Thanks!”

For another Thanksgiving-related project, click here.
For another easy fall wreath, click here.


Hang your wreath somewhere special and enjoy!

 
“In everything give thanks; 
for this is God’s will for you in Christ Jesus.”
 1 Thessalonians 5:18

Cost for this project:
-embroidery hoop: on hand (around $1 if purchased at Hobby Lobby)
-artificial fall leaves: on hand ($1 if purchased at the Dollar Tree)
-ribbon: on hand
-cardstock: on hand
-hot glue/gun: on hand
Total: FREE (about $2 or $3 if you have to purchase supplies for it)

Don’t you love FREE craft projects?

Filed Under: crafts, decorating, fall, frugal living, holidays, step-by-step

How to Use Washi Tape on Your Instagram Photos

August 31, 2012 by Aliesha

Lately I’ve been instagramming a lot of photos with washi tape captions:

Do you want to know how to add washi tape to your instagram photos too?  It’s not hard, but there are several steps involved.  It’s totally addictive, though, once you get the hang of it!  It will also make your photos appear more polished and … “fancy”!  haha.

The apps you will need are:
– built in Camera (or a fun camera app like Pudding Camera or Retro Camera – both free)
– (optional) a photo editor like BeFunky (free)
– Instagram (free)
– Masking Tape ($.99) – free alternatives (with not as many tape/color options) are Label Box or Label Plus
– Phonto (free)

Start by taking a photo with your built-in camera or another camera like Pudding Camera.

(Optional) Open it in BeFunky or another photo editor and adjust the sharpness/brightness/contrast/etc.  You can also add a filter at this point if you want.

Open the photo in Instagram, crop it, and apply your filter of choice.  Do NOT upload it… simply close out of Instagram and it should save it to your phone’s gallery.  (If this doesn’t work, put your phone in airplane mode, hit upload, and it will save it to your phone but fail to upload it.)

Open Masking Tape and open your cropped/filtered photo (far left icon at the bottom of the screen).  Add tape(s) of choice (far right button on bottom of screen) by dragging your finger across the photo.

Save your image (second button from right at bottom of screen).  Close Masking Tape.  (You can add text with Masking Tape, but there are not very many options, so I don’t use this feature.)

Open Phonto and open your photo with the washi tape on it.  Add text (button at top right) as desired.  You can change the font, size, and tilt.  You can even use your own fonts you’ve installed on your phone (I just installed 31 new fonts today!).  Save your image.

Open Instagram again and open your image from your Phonto files.  Expand the box around your photo so it doesn’t crop it again.  Add a caption and upload it!

I know this sounds like a lot of steps, but it really doesn’t take very long and it’s a fun, no-mess creative outlet for me that I can do in just a few minutes!

Don’t forget to follow me on instagram:  feathersinournest

Hope this tutorial is helpful to you! If you like it, pin it!

Filed Under: instagram, step-by-step

  • « Previous Page
  • 1
  • 2
  • 3
  • 4
  • …
  • 8
  • Next Page »
  • Email
  • Facebook
  • Instagram
  • Pinterest
  • RSS
  • Twitter
About Us

This blog shares our family's story and our journey from newlyweds to a family of seven. We share milestones, we share struggles, we share sweet memories, and we share about our Savior. Keep reading...

FACEBOOK

NEWSLETTER

Subscribe to our super-fun weekly newsletter! Enjoy exclusive content & fun bonuses!

* indicates required

Archives

INSTAGRAM

PINTEREST

Visit Aliesha @ Feathers in Our Nest's profile on Pinterest.

Popular Posts

newborn sleep routine

10 Tips for Establishing a Newborn Sleep Routine

What I Buy at Aldi

What I Buy at Aldi {Real Food}

essential oil blends

Essential Oil Blends – What Works for What?

DIY Citronella Candles {Keep Mosquitoes at Bay!}

Dream Diaper Bag: Review of Lily Jade Shaylee

Baby Basics: Guide to the Products I Love

Perfect Cold Brew Coffee at Home! Easy DIY recipe using a French Press | Feathers in Our Nest

Perfect Cold Brew Iced Coffee

See Other Popular Posts...

About Feathers in Our Nest

At Feathers in Our Nest, you can expect to find delicious recipes, homemaking tips, practical advice for frugal living, resources for those who are in ministry, inspiring links, and cute photos and stories about our children. You can browse older posts by checking out the Tips & Tutorials Page or the Recipes Page. Thanks for visiting! Read More…

  • Email
  • Facebook
  • Instagram
  • Pinterest
  • Twitter

Recent Posts

Easter Family Devotions | Feathers in Our Nest
Gospel Centered Books for Older Kids | Feathers in Our Nest
Gospel Centered Family Devotionals | Feathers in Our Nest
Gospel Centered Story Bibles | Feathers in Our Nest
Gospel Centered Picture Books | Feathers in Our Nest

Popular Topics

baby baking whole grains birthdays books bread breakfasts Christmas cooking Cordelia crafts deals decorating desserts essential oils everyday fall family food friends frugal living giveaways health and beauty healthy eating holidays homemaking hospitality house Jude main dishes marriage menu monday milestones ministry parenting photography pregnancy projects recipes reviews she {hearts} it sponsored Tad travels Vera worth repeating

Copyright © 2025 · Foodie Pro Theme by Shay Bocks · Built on the Genesis Framework · Powered by WordPress

Sign up below to join the Feathers in Our Nest email list!
Every Friday, you'll get exclusive content: the latest posts, recipes, photos, & more!
Your information will never be shared or sold to a third party.