Feathers in Our Nest

a blog about faith, family, food, & more written by a wife and stay at home mom of five

  • Home
  • About
  • Recipes

DIY Cuticle Cream

April 3, 2015 by Aliesha

DIY Cuticle Cream


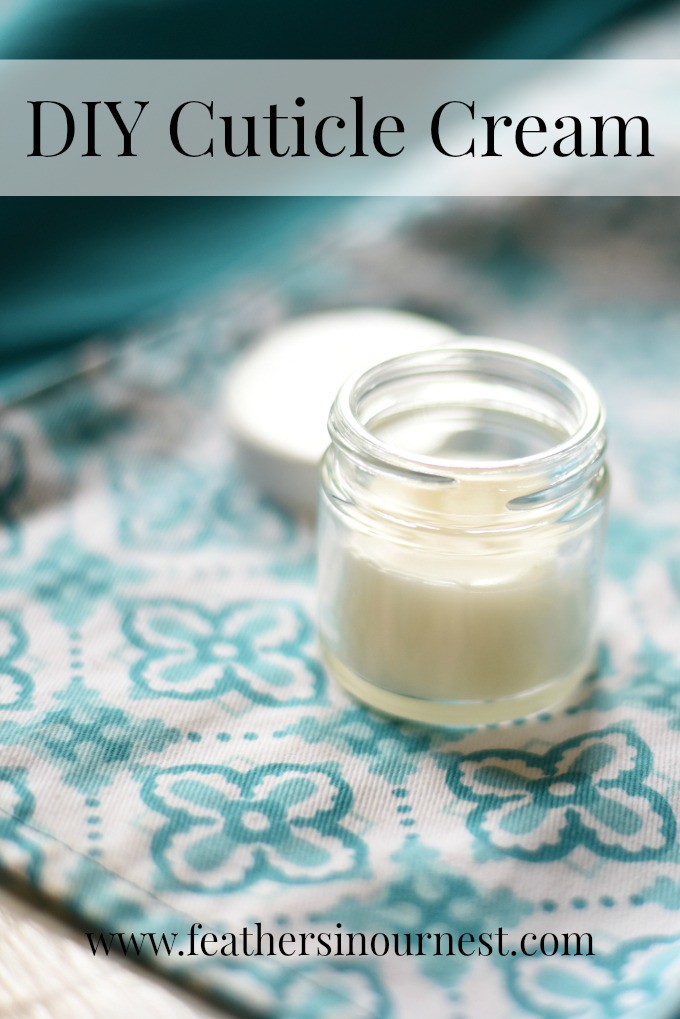
Keeping your cuticles soft and healthy is key to healthy nails and nail growth!  This recipe for cuticle cream is nourishing to the cuticles and skin around them, plus the essential oil combination helps inhibit bacteria.  Remember, never cut your cuticles.  If you need to push them back, do so very gently with an orange stick.

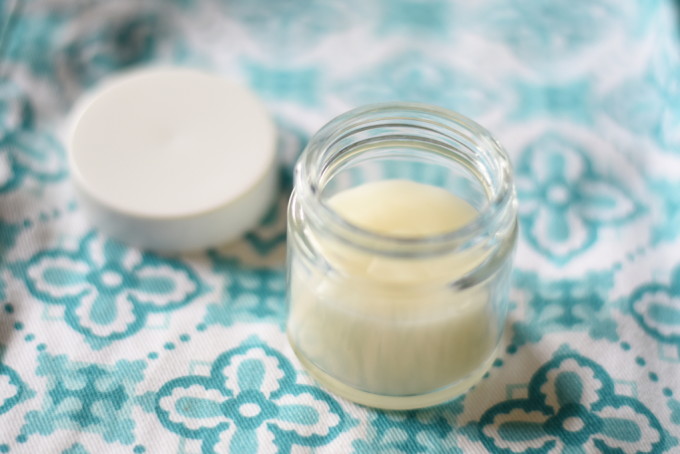
This recipe will make two small jars (of size pictured) of cuticle cream.  These jars are glass, and you can find similar ones at craft stores and on Amazon (these are pretty cute).  You could also use little metal tins!

DIY Cuticle Cream
 
Print
Easy DIY Cuticle Cream is made with essential oils and nourishing beeswax! Makes a great little gift!
Author: Aliesha @ Feathers in Our Nest
Ingredients
  • 3 Tbsp. olive oil
  • 1 Tbsp. beeswax pellets
  • 6 drops tea tree essential oil (or melaleuca)
  • 6 drops lavender essential oil
Instructions
  1. Place a mason jar inside a small pot of water on the stove top.
  2. Place olive oil and beeswax inside the jar and heat over low/medium heat, stirring as needed until melted.
  3. Remove from heat and add tea tree oil and lavender oil. Stir.
  4. Pour into glass jars or metal tins and allow to cool before using.
3.2.2929

Sources:  beeswax pellets / tea tree oil / melaleuca oil / lavender oil

DIY Cuticle Cream


Disclosure: This post contains affiliate links to the essential oil company I use and love. If you choose to make a purchase through my links, it will help support my family and this blog. Thanks!

ALIESHA CALDWELL IS A PARTICIPANT IN THE AMAZON SERVICES LLC ASSOCIATES PROGRAM, AN AFFILIATE ADVERTISING PROGRAM DESIGNED TO PROVIDE A MEANS FOR SITES TO EARN ADVERTISING FEES BY ADVERTISING AND LINKING TO AMAZON.COM.

Filed Under: essential oils, gifts, health and beauty

Okay… I Have Some Essential Oils – Now What?

March 12, 2015 by Aliesha

Getting Started with Essential Oils - the basics, such as carrier oils, diffusers, reference guides, and more!


If you’ve just decided to buy some essential oils (or you have some sitting in your cabinet untouched), it can feel pretty overwhelming to jump into using them!  I wanted to share some helpful tips for beginners, as well as useful “tools” that you may want to have to go along with your essential oils!

(If you don’t have a stash of oils yet, the KITS from RMO or NAN are a great place to start! They’ll help you save up to 20%!)

I know when I first started I felt confused by all the information out there, and a post like this would have been helpful to me when I was getting started with essential oils!

Carrier Oil

After your essential oils, a carrier oil is the first thing you will need so that you can dilute your oils and use them.  You can use extra virgin olive oil from your kitchen cabinet, but there are so many other oils to try as well!  I mostly use fractionated coconut oil and jojoba oil, depending on the use.  Fractionated coconut oil, unlike “regular” coconut oil, is liquid below 75 degrees.  It also doesn’t leave an oily residue on clothing or sheets.  It’s practically odorless, it absorbs into the skin quickly, and it has healing properties of its own.  Jojoba oil is my go-to carrier oil for essential oils that I use on my face (not many… just Frankincense and Melaleuca).  It is very moisturizing and it’s not too hard to find (I buy it at Trader Joe’s).  Others that I have used are regular extra virgin coconut oil (melts at body temperature as you rub it in) and grapeseed oil.  You may want to try others such as sweet almond oil or apricot kernel oil, but I haven’t personally used those.

Essential Oils Roller BottlesGlass Roller Bottles

If you’re diluting your oils in a carrier oil, you’re going to need something to put them in, right?  I love these amber 10 ml glass roller bottles and I use them most often.  If I’m just making a blend of oils or diluting one oil for one-time use, I just mix it in a small glass bowl.  But if it’s a blend or a single oil that I plan on using more frequently, I go ahead and make a bottle.  I’ve learned to always label the bottle with the oil(s) in it, the carrier oil, and the dilution.  Oh, I’ll remember, you think. You won’t. Label it.  I like to use washi tape to quickly and easily label my bottles!  To make a bottle, I add the appropriate amount of drops of essential oil to the empty roller bottle, then I fill it the rest of the way with my chosen carrier oil.  If you’re having trouble getting the exact amount of drops of essential oil, you may want to grab some pipettes (helpful for lots of things!).

Essential Oil DiffuserDiffuser

A diffuser is so nice to have in order to experience the benefits of essential oils in another way besides topical use.  Diffusing is one of the most effective ways to use essential oils!  I have a small one (similar in size to this one) that I can move from room to room, but RMO/NAN sells a really nice larger one that is great for filling bigger rooms or open floor plans!  You’ll add water to your diffuser, then a few drops of an essential oil (or a blend).  Diffusers are wonderful for setting a specific mood or for purifying the air!

Essential Oils Reference GuideReference Guide

There is a lot of good information online regarding essential oils (I trust and love to read RMO’s blog and the descriptions/uses of each oil on their site), but there is also a lot of misinformation floating around out there on other blogs.  I frequently come across blogs that prescribe using ridiculous amounts of essential oils on children, etc. so you just have to be so careful about where your information comes from!  I recently bought this book and I absolutely love it.  It’s not directly tied to a certain oil brand, and the information is very balanced.  There’s just something about having a reference book you can flip through when needed (especially in an emergency situation where you may not have power or the internet).

Essential Oils StorageStorage

Storage for your oils can be as simple as a clear plastic shoebox, or something like a padded carrier.  It could be a shelf or a wooden box or a bag with lots of pockets!  The important thing is to be able to keep all your oils safely somewhere where you can locate them when you need them (and keep them out of reach of children).  A cool, dark place is best.  I have a few small padded carriers (similar to these) that I use for keeping mine.  At some point I think I’d like to have them all in one big case!  Also, you may want to get a small travel case so you can take your favorite oils with you on the go.  I have this one.

Frequently Asked Questions

How much should I dilute my oils?
Well this is the million dollar question, isn’t it?  From using oils straight out of the bottle (neat) to diluting down to 0.5%, I’ve heard it all, and I’m sure you have too.  Both of those extremes are not where I land personally.  Using oils neat can be unwise, depending on the oil and how frequently you’re using it, plus your oils will go further if you dilute them before using.  I almost always dilute my oils before using them.  With that said, when you dilute an oil (particularly common, not-very-complex oils) to less than 2%, you are most likely just creating a placebo.  Do your own research on this issue, but my personal choice is around 5-10% dilution for most oils.  There are exceptions to this rate (and I’m very careful with what oils I use on my kids and how much I dilute them), but I tend to err on the side of being too safe.  Based on my research and from information received from RMO, 10-25% is safe for most adults.  If you’ve diluted an oil to 3% and it doesn’t seem to be working, you may want to consider trying a higher dilution rate.

What oils or blends are good for diffusing?
Any citrus oils or blends are lovely (bergamot, lemon, orange, lime, Citrus Passion, Orange Cream, etc.); lavender + vetiver is a good blend for nighttime; purify can help “cleanse” a room; Calming and Peace & Quiet both smell wonderful; and there are so many more!

Do essential oils expire?
High quality oils last a very long time (10+ years) before becoming less effective, and some oils actually become more potent the longer they sit.

Where do I apply the oils?
Generally speaking, you’ll want to apply the oils to the area that you want to treat.  For example, for back pain, massage into your back.  For a headache, apply to your temples or the back of your neck.  For a cut, apply on the cut.  For period cramps, apply on your lower back.  If you’re applying oils for general wellness and immune support, the best place to apply is on your feet.  Your skin is not as sensitive there and the oils are quickly absorbed into your system that way.  Most oils should not be applied to the face, unless they are recommended for that purpose.

Is it possible to have an allergic reaction to an essential oil?
Yes. You absolutely could experience a rash or a headache due to an allergic reaction to an oil. Just because essential oils are natural doesn’t mean you can’t react to them! Most allergies in general are to “natural” things, after all.  If you do experience a rash, stop using the oil and find a different one to achieve the same purpose. When trying new oils, open up the bottle and smell it.  Wait a bit and see if you get a headache.  Then try using it diluted on a small area of the body to make sure it doesn’t cause an issue for you.  Definitely don’t just drop some new oils into the tub and soak your whole body in them without first testing your skin.  All of that said, you don’t need to treat oils like snake venom.  Most people don’t have problems with the majority of oils.

What oils are safe to use while pregnant?
I actually will be writing a whole post about this, so stay tuned!  For the time being, look up each oil before you use it to make sure it is safe for pregnancy. Some can cause contractions.

Do you have any other questions about essential oils? Leave a comment and I’ll do my best to answer!

Disclosure: I have included affiliate links in this post to the essential oil company I use and love. If you choose to make a purchase through these links, it will help support my family and this blog. Thanks!

ALIESHA CALDWELL IS A PARTICIPANT IN THE AMAZON SERVICES LLC ASSOCIATES PROGRAM, AN AFFILIATE ADVERTISING PROGRAM DESIGNED TO PROVIDE A MEANS FOR SITES TO EARN ADVERTISING FEES BY ADVERTISING AND LINKING TO AMAZON.COM.

Filed Under: essential oils

DIY Dry Shampoo

February 27, 2015 by Aliesha

DIY-Dry-Shampoo-2One of the projects in my latest Homegrown Collective box was DIY dry shampoo!  I have wanted to make this, so I was glad I finally did!  I don’t wash my hair every day, so I love having a way to freshen up my locks without having to shampoo!  I’ve used commercial dry shampoo in the past, but it completely dries out my hair and scalp.  This DIY recipe worked great with no adverse effects!

I added rosemary essential oil to the dry shampoo to help encourage hair growth, strengthen hair, and to treat dry scalp and prevent dandruff.  Rosemary is an excellent oil for your hair!

You can customize this recipe based on your hair color (cool, right?).  For blonde or light hair, don’t add anything.  For brown or dark hair, add cocoa powder until it’s the shade you want.  For auburn or red hair, add cinnamon for your desired shade.

DIY Dry Shampoo
 
Print
This dry shampoo is easy to make and helps promote healthy hair!
Author: Aliesha @ Feathers in Our Nest
Ingredients
  • ½ cup cornstarch (organic, non-GMO preferred)
  • 2 tsp. cocoa powder (for brown/dark hair) or cinnamon (for auburn/red hair)
  • 4 drops rosemary essential oil
Instructions
  1. In a glass shaker jar, combine all ingredients.
  2. Stir or shake to combine (cover holes when shaking).
  3. Sprinkle on hair at roots (all over head), using your fingers to comb it through.
  4. Wait 2 minutes, then brush out any remaining dry shampoo.
3.2.2929

Sources: glass shaker jars (or find at your local Wal-mart) / rosemary essential oil

DIY-Dry-ShampooLet me know if you try it!

Disclosure: This post contains affiliate links. If you make a purchase through my links, it will help support my family and this blog. Thank you!

Filed Under: essential oils, health and beauty

  • « Previous Page
  • 1
  • …
  • 5
  • 6
  • 7
  • 8
  • 9
  • …
  • 11
  • Next Page »
  • Email
  • Facebook
  • Instagram
  • Pinterest
  • RSS
  • Twitter
About Us

This blog shares our family's story and our journey from newlyweds to a family of seven. We share milestones, we share struggles, we share sweet memories, and we share about our Savior. Keep reading...

FACEBOOK

NEWSLETTER

Subscribe to our super-fun weekly newsletter! Enjoy exclusive content & fun bonuses!

* indicates required

Archives

INSTAGRAM

PINTEREST

Visit Aliesha @ Feathers in Our Nest's profile on Pinterest.

Popular Posts

newborn sleep routine

10 Tips for Establishing a Newborn Sleep Routine

What I Buy at Aldi

What I Buy at Aldi {Real Food}

essential oil blends

Essential Oil Blends – What Works for What?

DIY Citronella Candles {Keep Mosquitoes at Bay!}

Dream Diaper Bag: Review of Lily Jade Shaylee

Baby Basics: Guide to the Products I Love

Perfect Cold Brew Coffee at Home! Easy DIY recipe using a French Press | Feathers in Our Nest

Perfect Cold Brew Iced Coffee

See Other Popular Posts...

About Feathers in Our Nest

At Feathers in Our Nest, you can expect to find delicious recipes, homemaking tips, practical advice for frugal living, resources for those who are in ministry, inspiring links, and cute photos and stories about our children. You can browse older posts by checking out the Tips & Tutorials Page or the Recipes Page. Thanks for visiting! Read More…

  • Email
  • Facebook
  • Instagram
  • Pinterest
  • Twitter

Recent Posts

Easter Family Devotions | Feathers in Our Nest
Gospel Centered Books for Older Kids | Feathers in Our Nest
Gospel Centered Family Devotionals | Feathers in Our Nest
Gospel Centered Story Bibles | Feathers in Our Nest
Gospel Centered Picture Books | Feathers in Our Nest

Popular Topics

baby baking whole grains birthdays books bread breakfasts Christmas cooking Cordelia crafts deals decorating desserts essential oils everyday fall family food friends frugal living giveaways health and beauty healthy eating holidays homemaking hospitality house Jude main dishes marriage menu monday milestones ministry parenting photography pregnancy projects recipes reviews she {hearts} it sponsored Tad travels Vera worth repeating

Copyright © 2025 · Foodie Pro Theme by Shay Bocks · Built on the Genesis Framework · Powered by WordPress

Sign up below to join the Feathers in Our Nest email list!
Every Friday, you'll get exclusive content: the latest posts, recipes, photos, & more!
Your information will never be shared or sold to a third party.