Feathers in Our Nest

a blog about faith, family, food, & more written by a wife and stay at home mom of five

  • Home
  • About
  • Recipes

Handmade Lip Balm

December 27, 2014 by Aliesha

homemade-lip-balm

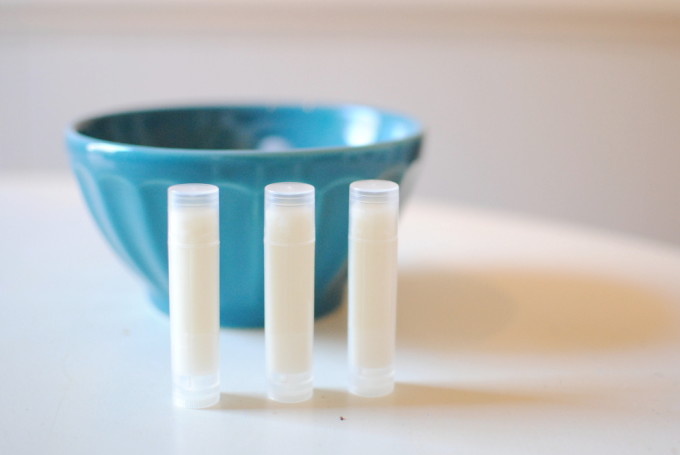
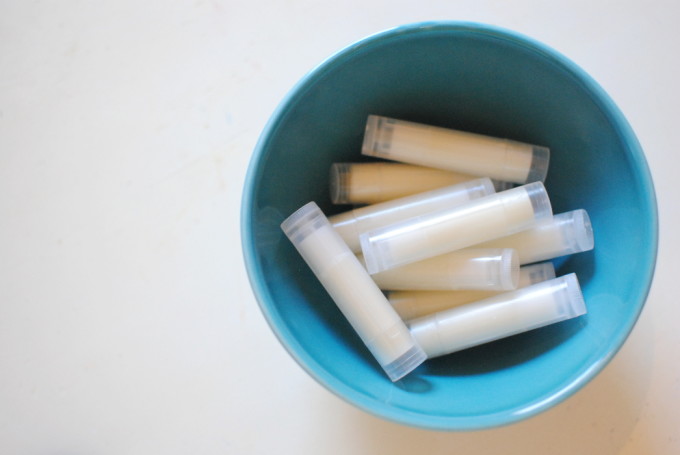
I ordered a slew of empty lip balm tubes back in the fall, hoping I would have a chance to make some homemade lip balm before Christmas. Time slipped away, so I just got around to doing it yesterday morning!  I wish I had known just how easy and fast it was (less than 15 minutes while the kids were all awake), because I probably could have made some lip balms to give away as Christmas gifts!  There’s always next year, right?  Ooooh… or Valentine’s Day!

This lip balm is so soft and soothing to dry lips. My girls love using it, and because it is made with safe, natural ingredients, I feel totally comfortable with them using it as often as they like!

The batch I made yesterday is plain; I didn’t add any essential oils to it.  But it would be lovely with spearmint (great for kids), vanilla, or peppermint essential oil!

Here is my recipe for homemade lip balm!

Handmade Lip Balm
 
Print
Easy DIY handmade lip balms are soothing to your dry winter lips, and they make wonderful little gifts!
Author: Aliesha @ Feathers in Our Nest
Recipe type: Health and Beauty
Cuisine: n/a
Ingredients
  • 2 Tbsp. beeswax pellets
  • 2 Tbsp. unrefined shea butter
  • 2 Tbsp. coconut oil
  • (optional) 5 drops essential oil (i.e. spearmint, peppermint, etc.)
  • 12 empty lip balm tubes
Instructions
  1. Prepare lip balm tubes by removing caps and grouping them in a tight bunch with a rubber band.
  2. Set a mason jar in a pot of water on the stove, and heat the water over medium heat.
  3. Put the beeswax pellets in the mason jar and melt.
  4. Add the shea butter and the coconut oil, stirring until melted as well.
  5. Quickly transfer the mixture to a glass measuring cup.
  6. Carefully pour the mixture into each tube, filling each tube as full as possible.
  7. When all the tubes are full, go back and "top off" each of them.
  8. Let cool, then wipe down the sides of the tubes to clean up any drips.
  9. Enjoy!
3.2.2885

Sources:  beeswax  |  shea butter  |  essential oils  |  lip balm tubes

homemade-lip-balm2 homemade-lip-balm3

This would be a fun snowy day project!

Disclosure: I have included affiliate links throughout this post to the essential oil company I use and love. If you choose to purchase oils through my links, it will help support this blog and my family! Thank you!

Filed Under: crafts, health and beauty

Ginger Spice Cookie Soap

December 11, 2014 by Aliesha

I’ve been experimenting with all kinds of homemade soap combinations, and I really liked how this particular one turned out!  Ever since my Homegrown Collective box came last month, I’ve really been enjoying soap-making.  I made a bunch of different bars to give away as gifts, and I decided to share this “recipe” with you!

This soap really reminds me of a cookie.  It’s sweet, but not too sweet, and the ginger scent is so Christmasey.  The goat’s milk soap base I used is very moisturizing, and to top it off, there is oatmeal in it as well for added moisturizing benefits!

Using a melt and pour soap base makes soap-making SO easy.  You can easily triple this recipe to make three bars at once, if you like!  That’s what I usually do, since I have three soap molds.

Ginger Spice Cookie Soap

4 oz. melt and pour soap base (I like this kind)
5 drops Ginger Spice essential oil blend (if you don’t have this blend, see note below)
1 Tbsp. oatmeal

Prepare soap mold (this is the one I have) by sprinkling oatmeal in the bottom.  If you don’t have a soap mold, you can use something else, like a muffin tin, a bowl, or a small box, as long as you line it with freezer paper. (Here are a few clever ideas.)

Grate soap base with a grater (it’s nice to use one that is dedicated to soap-making).  In a double boiler or a glass bowl placed securely over a pot of water, melt grated soap base.  Stir constantly with a popsicle stick or thin wooden dowel while it is melting.

Remove from heat.  Add 5 drops of Ginger Spice essential oil blend.  Stir to combine.

Pour melted soap into the mold.  The oatmeal may float to the top, and that’s okay!

Allow to cool at room temperature until hardened.  Pop out of the soap mold.  If you have trouble getting it out, stick it in the freezer for 5 minutes and then it should come out without a problem.

You can wrap up the soap to give it away (I love to use brown kraft paper), or you can use it immediately!


Note: If you have a stash of essential oils, but not Ginger Spice, you could try making your own blend using orange, cassia or cinnamon bark, ginger root, and clove bud.  I’m not sure about the ratios, but play around until you like the fragrance.  Then add 5 drops of your blend to this soap recipe!

Don’t forget: shipping is now free on all orders at Rocky Mountain Oils!

Facebook  |  Instagram  |  Pinterest  |  Twitter

Disclosure: I was not paid to write this post, but it does contain affiliate links to the essential oil company I use and love.  If you choose to purchase oils through my links, it will help support my family and this blog.  Thank you! 

Aliesha Caldwell is a participant in the Amazon Services LLC Associates Program, an affiliate advertising program designed to provide a means for sites to earn advertising fees by advertising and linking to amazon.com.

Filed Under: crafts, essential oils, gift ideas, health and beauty, homemaking, projects

Thankful Tree {Guest Post}

November 12, 2014 by Aliesha

Today I’m excited to share this guest post from my mom!  I know you’re going to love this idea for celebrating Thanksgiving in a tangible way!

Hi!  I am Valerie, the blessed mother of my dear daughter Aliesha…and “MiMi” to those adorable kiddos, Vera, CC and Jude.  Along with their hubby/daddy, Tad, they are some of my most precious blessings!

For the past three months, I have been part of a great Bible Study on gratitude, using the book Choosing Gratitude by Nancy Leigh DeMoss.  It has been a wonderful challenge to obey God’s exhortation to “be thankful in all things.”

One young woman, Aimee, in our group has been endeavoring to teach her little ones about gratitude.  She has three little guys very near in age to Aliesha’s children (so we trade toddler stories!)  Aimee cut out lots of fall leaves and she made a “branch tree” to hang them on.  Each day she asks her boys what they are thankful for and after they give her their answer, she writes it on a leaf and hangs in on the tree.  I think she said she had to get a bigger branch since they had put so many “THANKFUL leaves” on the first one.

Aimee plans to use snowflakes after Thanksgiving and flowers in the spring.  Think what a family memory treasure this will be if she saves all of these thankful shapes in a box or book!

This is such a good way to create the contagious attitude of thankfulness…in our hearts and the hearts of our children and grandchildren.  Maybe it might be something you could incorporate into the life of your family!

Thanks for letting me share this little idea!
Love,
Valerie

Aimee added this: “Its a great way for my husband and I to keep our thankfulness at the forefront of our minds and train our boys to have attitudes of gratitude to GOD.”

Filed Under: crafts, holidays

  • « Previous Page
  • 1
  • 2
  • 3
  • 4
  • …
  • 16
  • Next Page »
  • Email
  • Facebook
  • Instagram
  • Pinterest
  • RSS
  • Twitter
About Us

This blog shares our family's story and our journey from newlyweds to a family of seven. We share milestones, we share struggles, we share sweet memories, and we share about our Savior. Keep reading...

FACEBOOK

NEWSLETTER

Subscribe to our super-fun weekly newsletter! Enjoy exclusive content & fun bonuses!

* indicates required

Archives

INSTAGRAM

PINTEREST

Visit Aliesha @ Feathers in Our Nest's profile on Pinterest.

Popular Posts

newborn sleep routine

10 Tips for Establishing a Newborn Sleep Routine

What I Buy at Aldi

What I Buy at Aldi {Real Food}

essential oil blends

Essential Oil Blends – What Works for What?

DIY Citronella Candles {Keep Mosquitoes at Bay!}

Dream Diaper Bag: Review of Lily Jade Shaylee

Baby Basics: Guide to the Products I Love

Perfect Cold Brew Coffee at Home! Easy DIY recipe using a French Press | Feathers in Our Nest

Perfect Cold Brew Iced Coffee

See Other Popular Posts...

About Feathers in Our Nest

At Feathers in Our Nest, you can expect to find delicious recipes, homemaking tips, practical advice for frugal living, resources for those who are in ministry, inspiring links, and cute photos and stories about our children. You can browse older posts by checking out the Tips & Tutorials Page or the Recipes Page. Thanks for visiting! Read More…

  • Email
  • Facebook
  • Instagram
  • Pinterest
  • Twitter

Recent Posts

Easter Family Devotions | Feathers in Our Nest
Gospel Centered Books for Older Kids | Feathers in Our Nest
Gospel Centered Family Devotionals | Feathers in Our Nest
Gospel Centered Story Bibles | Feathers in Our Nest
Gospel Centered Picture Books | Feathers in Our Nest

Popular Topics

baby baking whole grains birthdays books bread breakfasts Christmas cooking Cordelia crafts deals decorating desserts essential oils everyday fall family food friends frugal living giveaways health and beauty healthy eating holidays homemaking hospitality house Jude main dishes marriage menu monday milestones ministry parenting photography pregnancy projects recipes reviews she {hearts} it sponsored Tad travels Vera worth repeating

Copyright © 2025 · Foodie Pro Theme by Shay Bocks · Built on the Genesis Framework · Powered by WordPress

Sign up below to join the Feathers in Our Nest email list!
Every Friday, you'll get exclusive content: the latest posts, recipes, photos, & more!
Your information will never be shared or sold to a third party.